Recently, I’ve been delving deep into a little forensic goldmine known as Google Drive for Desktop. Specifically, the feature Google Drive File Stream and the glorious nuggets it leaves behind. Persistent records of USB device connections with volume guids, a database with the complete Google Drive file and folder metadata for synced drives (including Shared Team drives), logged in user information, and more. I could write a novel at this point about how to leverage this data in investigations. For the purposes of this article though, I want to focus on the best bits of all…the deleted file records. ESPECIALLY the PERMANENTLY deleted file records. Let’s jump in.

First things first, HUGE shout out to Amged Wageh who has done awesome research on Drive File Stream data. I highly recommend his article “DriveFS Sleuth — Your Ultimate Google Drive File Stream Investigator!” and follow-up article on some of the protbuf data we worked together to decode “DriveFS Sleuth — Revealing The Hidden Intelligence“. Even better, try out his Python tool, DriveFS Sleuth, that pulls out a lot of this data for you. Check it out on GitHub.
Let’s get started with a primer on where to locate the data we’ll need to start gathering as much intel as possible on a file that was deleted from a Google Drive. For the purposes of this article, I will focus on Windows. When a user downloads and installs Google Drive for Desktop on a Windows machine, a folder titled “DriveFS” is created in their AppData folder here: %LocalAppData%\Google\DriveFS.
Go ahead and determine attribution up top. Because here’s the thing. Users can authenticate to MULTIPLE Google accounts in Google Drive for Desktop and Google dumps all the logs into ONE folder. 🤮 We’ll do this in two ways. First, we’ll examine the PhenotypeValues table (um…the only table) in the experiments.db database located at %LocalAppData%\Google\DriveFS\experiments.db.

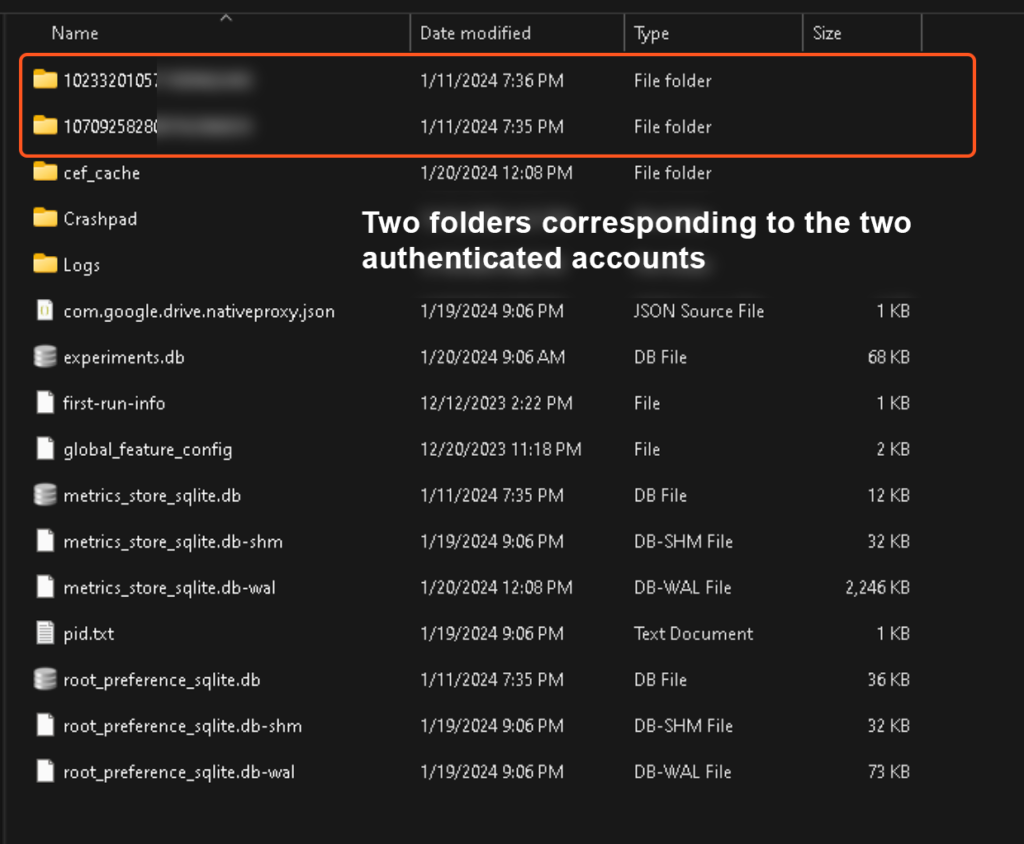
By viewing the blob for “account_ids” we can observe not one, but two account ids in the ASCII. That is because this device has two Google accounts authenticated in the Google Drive for Desktop application. These values correspond to folder names within the DriveFS folder that contain the individual data for those separate accounts, like so:
Ok that’s great but having an arbitrary alphanumerical identifier doesn’t get us very far attribution wise. For that, we’re going to turn to the drive_fs.txt logs stored in the logs folder: %LocalAppData%\Google\DriveFS\Logs\drive_fs.txt.
By doing a text search for “authorized as” you can get to the lines in the log that will give you the authorized email address with its corresponding user ID:

Now that we know what accounts we’re dealing with, we can start to examine the artifacts for those accounts within their respective folders. The main database we’re concerned with is here: %LocalAppData%\Google\DriveFS\[Account ID]\metadata_sqlite_db.
The metadata_sqlite_db database contains the metadata and parent child relationship information for every file and folder within the drives the user has elected to sync. Feels a little extra? Well, the whole point of Drive File Stream is to keep the data in the cloud and off the user’s device. But the application still needs to give the user a seamless experience when they want to open a folder or file. Hence, everything but the data is ready to go at a moment’s notice. Also keep in mind that the user’s My Drive is not the only data the user can sync. Users may additionally be syncing Shared With Me files and folders, Shared Team Drives, and even whole other devices under My Computers. We then get to benefit from all that metadata (and even some of the cached content…but that’s for another post).
Since this article is about deletion artifacts, I won’t delve too deep into the wealth of data points in this database. But know that you can use the information in this database to, among many other things, rebuild the folder structure of a drive, get MD5 hashes of files, modification dates, “viewed by me” dates, “shared with me” dates, mime types, and whether your target is the owner of the file in question. With that said, let’s look at a trashed item in the “items” table:

Items that are in a Google Drive’s Trash live right alongside non-trashed items in the “items” table. The “trashed” column is a Boolean column where 0 = not trashed and 1 = trashed. Let’s talk about Google Trash for a minute. By default, Google keeps an item in the Trash until one of the following happens: a) 30 days passes, b) a user elects to permanently delete the item, or c) a user empties the Trash (“Delete & restore files in Google Drive“). Some caveats to this exist when Google Vault is in play with retention policies in place, but you get the idea. What this means generally is that if you have imaged a device and see an item that is trashed, you can conclude that the item had to have been deleted in the last 30 days from the day of imaging. Neat!
What happens when a file IS permanently deleted? Is that information gone forever? Not necessarily…
Another table exists in this database called “deleted_items”. When one of the aforementioned three scenarios happens, and a file is permanently deleted, it will briefly move to this table. How briefly?
¯\_(ツ)_/¯
We don’t know! I can say that in my own testing, these items would disappear overnight. Take that with a grain of salt and do your own testing.
Let’s look at what we get from this table:
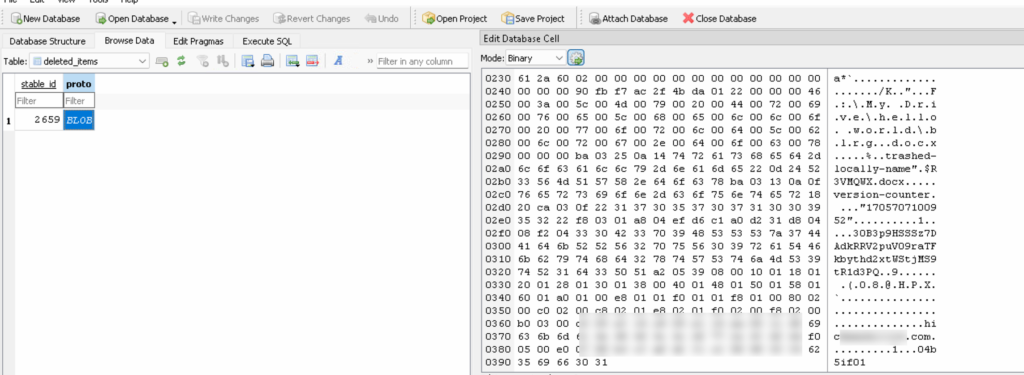
Fantastic! A protobuf blob! (said only psychopaths).
Decoding Google protobufs is outside the scope of this article. BUT. It’s a very good skill to learn. Basically, you have a few options. You can dump these to bin files and run protoc –decode_raw against them: protoc --decode_raw < deleted_item.bin. This will give you the raw key value pairs (just no labels or field types). Or you can use this awesome new tool that Amged (see shout out above) introduced me to when we were trying to decode this artifact. It’s called ProtoDeep and it’s amazing. 🤩
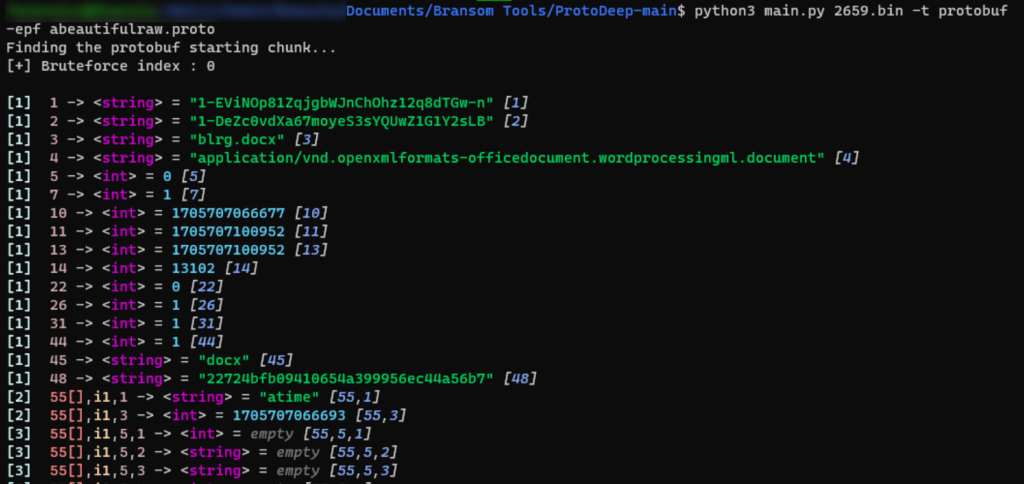
Now we’re getting somewhere. This not only gives me the data in a more readable format, but it also tells me the field types. This is crucial information when trying to recreate a proto file. And already we can make out some of the information available to us. The file name, mime type, extension, and some dates and cloud ids immediately jump out. But what the heck are these dates and ids? 🧐
This is where the hard work of forensics comes in. Testing testing testing testing testing. As I confirmed what the value of each field was in testing, I added that label to my proto file. Here are the fields that I have located through testing that allowed me to build a basic proto file to use moving forward:
package deletedpackage;
syntax = "proto3";


message deletedmessage {
    string urlid = 1;
    string filename = 3;
    string parenturlid = 2;
    string mimetype = 4;
    int64 trashed = 7;

    int64 modified_date = 11;
    int64 viewed_by_me = 13;
    int64 filesize = 14;
    string fileextension = 45;
    string hash = 48;
    int64 isowner = 63;
    int64 stableid = 88;
    int64 parentstableid = 89;
    string workspace = 93;


    repeated fileprops fileproperties = 55;


    message fileprops {
        string name = 1;
        int64 value = 2;
        string goodies = 4;

        message metadatavalues {
         bytes metadatahex = 1;
        }

        bytes metadata = 5;
      }
}
I wrote a little script to run my bin files against this proto file and spit out JSON and here was my first pass for one of my bins:
[
    {
        "urlid": "16VGa2GJhPdnRXxroEyh8IYgNoGYK_O-E",
        "parenturlid": "0AHp9HSSSz7DAUk9PVA",
        "filename": "hello world.txt",
        "mimetype": "text/plain",
        "trashed": { "low": 1, "high": 0, "unsigned": false },
        "modifiedDate": { "low": -1897073029, "high": 389, "unsigned": false },
        "viewedByMe": { "low": -1357305845, "high": 390, "unsigned": false },
        "filesize": { "low": 11, "high": 0, "unsigned": false },
        "fileextension": "txt",
        "hash": "5eb63bbbe01eeed093cb22bb8f5acdc3",
        "fileproperties": [
            { "name": "churn-count" },
            {
                "name": "content-entry",
                "metadata": {
                    "type": "Buffer",
                    "data": [
                        8, 230, 3, 18, 51, 48, 66, 51, 112, 57, 72, 83, 83, 83, 122, 55, 68,
                        65, 86, 86, 112, 51, 100, 71, 70, 48, 98, 107, 73, 120, 90, 68, 85,
                        114, 81, 85, 104, 117, 77, 107, 56, 119, 78, 71, 70, 78, 84, 67,
                        116, 120, 89, 48, 120, 122, 80, 81, 26, 33, 49, 54, 86, 71, 97, 50,
                        71, 74, 104, 80, 100, 110, 82, 88, 120, 114, 111, 69, 121, 104, 56,
                        73, 89, 103, 78, 111, 71, 89, 75, 95, 79, 45, 69, 32, 11
                    ]
                }
            },
            { "name": "local-cache-reason" },
            { "name": "local-title", "goodies": "hello world.txt" },
            {
                "name": "trashed-locally",
                "value": { "low": 1, "high": 0, "unsigned": false }
            },
            {
                "name": "trashed-locally-metadata",
                "metadata": {
                    "type": "Buffer",
                    "data": [
                        2, 0, 0, 0, 0, 0, 0, 0, 11, 0, 0, 0, 0, 0, 0, 0, 192, 152, 0, 213,
                        252, 52, 218, 1, 28, 0, 0, 0, 75, 0, 58, 0, 92, 0, 77, 0, 121, 0,
                        32, 0, 68, 0, 114, 0, 105, 0, 118, 0, 101, 0, 92, 0, 104, 0, 101, 0,
                        108, 0, 108, 0, 111, 0, 32, 0, 119, 0, 111, 0, 114, 0, 108, 0, 100,
                        0, 46, 0, 116, 0, 120, 0, 116, 0, 0, 0
                    ]
                }
            },
            { "name": "trashed-locally-name", "goodies": "$RNMMJ9D.txt" },
            { "name": "version-counter" }
        ],
        "isowner": { "low": 1, "high": 0, "unsigned": false },
        "stableid": { "low": 308, "high": 0, "unsigned": false },
        "parentstableid": { "low": 101, "high": 0, "unsigned": false },
        "workspace": "BLAHBLAHBLAH.com"
    }
]
The dates and integers needed conversion, and, if you’re like me, you’re not sleeping until that buffer data under “trashed-locally-metadata” is yours. After converting it to hex and doing a lot of byte sweeping, I figured out the offsets and adjusted my code. Here is what my data looks like now:
[
    {
        "url_id": "1-EViNOp81ZqjgbWJnChOhz12q8dTGw-n",
        "filename": "blrg.docx",
        "parent_id": "1-DeZc0vdXa67moyeS3sYQUwZ1G1Y2sLB",
        "mime_type": "application/vnd.openxmlformats-officedocument.wordprocessingml.document",
        "is_trashed": "1",
        "modified_date_epoch": "1705707100952",
        "viewed_by_me_epoch": "1705707100952",
        "file_size": "13102",
        "file_extension": "docx",
        "hash": "22724bfb09410654a399956ec44a56b7",
        "is_owner": "1",
        "stable_id": "2659",
        "parent_stable_id": "2657",
        "workspace": "hickmanhollow.com",
        "trashed_date": "2024-01-19T23:31:49.833Z",
        "trashed_local": "1",
        "recycle_bin_r_file": "$R3VMQWX.docx"
    }
]
THE LOCALLY TRASHED METADATA HAS THE DAY THE FILE WAS MOVED TO THE TRASH. 😭
Isn’t it beautiful? 🥹
Naturally, it wouldn’t be forensics without some gotchas. Things to be aware of:
- Attribution is very very very tricky when Shared Drives are involved. If Bad Guy Bob permanently deletes a file from a Shared Drive of which Innocent Allison is also a member, that permanent deletion will show up in HER device’s metadata_sqlite_db database.
- You’re only going to get this locally trashed metadata if the file was deleted from the local file system. You will not get the moved to trash date if the user moved the item to the trash from a browser.
- You WILL get this locally trashed metadata if the file was deleted from the local file system and the item was permanently deleted in the browser though.
That brings us to my current monomania: Where. Is. THE PERMANENT DELETION DATE????
I’ve looked high and low and run binary searches with the cloud ids of permanently deleted files and the only hits I get are in the structured_logs in the Logs folder. The problem? They’re structured logs. 😫
Like protobuf data, you must know the structure of the structured log in order to deserialize it into something that makes sense. If you open a structured log in a text editor, it will look something like this:

Not very useful. On your test devices, you can shift-click on the gear icon in the Google Drive for Desktop app and select “Generate Diagnostic Info” and it will take the structured logs and spit them out as one legible text file that looks JSON-ish. (It isn’t JSON). As suspected, these logs are full of sweet sweet nuggets.
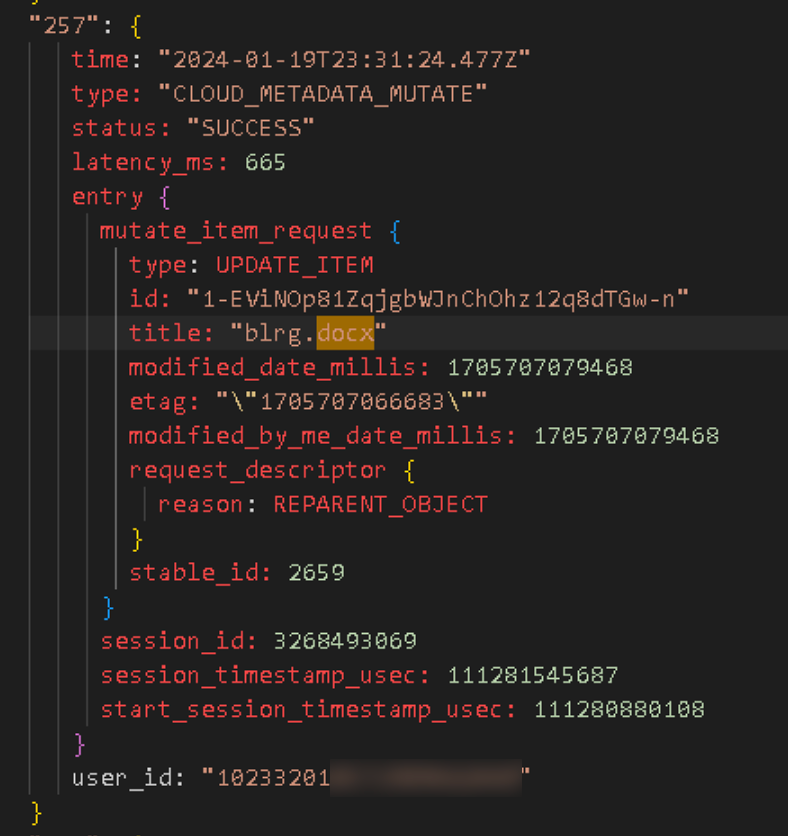
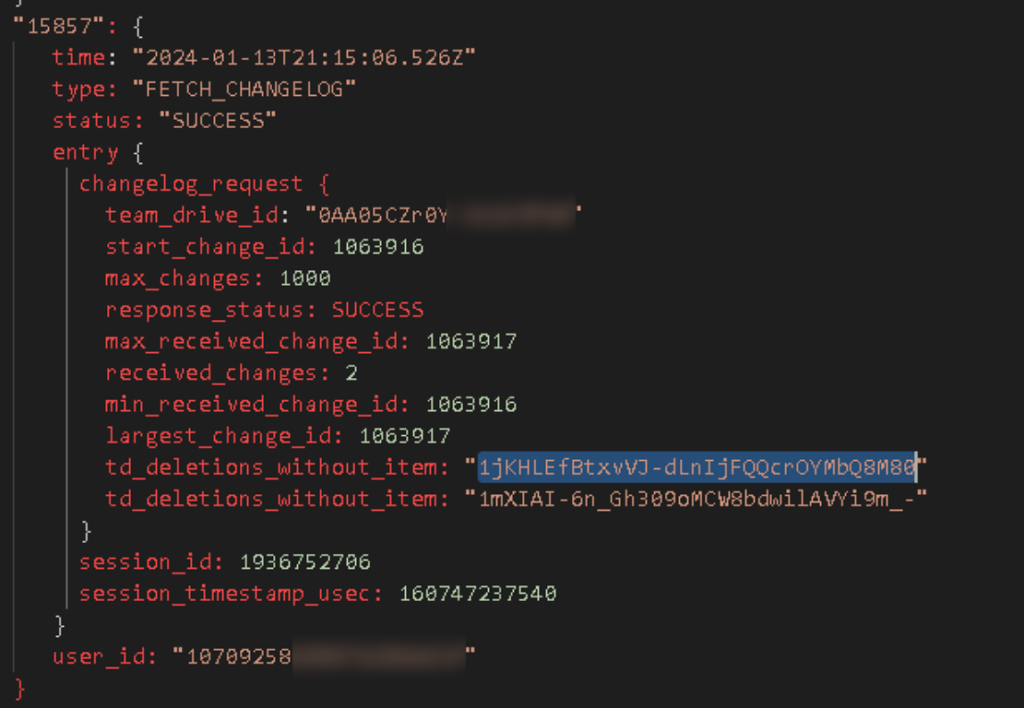
Google leverages the Changes API and records events from both the cloud and the local file system in these logs. I was able to follow the life of this local file through the CELLO_FS events and Cloud changes right up until….you guessed it…permanent deletion. I *suspect* that this type of event is probably where my holy grail is stored, but I need more testing to confirm:
Now…all of this is great if I was triaging a live system. But none of this matters if I can’t read the structured logs of a dead box image. Here’s what I’ve tried:
- Every commercial forensics tool.
- Reaching out to Google support for my test workspace for intel (“tHEsE AReN’T MeanT tO be REaD pLEAsE ZiP anD send TO US”).
- Every open-source log viewer I could find, including some pretty dubious ones.
- Writing my own parser using the Google Logging API.
- An exciting journey of importing logs into Google Cloud logging and then having my hopes and dreams crushed.
For number four, I basically tried to shoehorn them in following these instructions: “Importing logs from Cloud Storage to Cloud Logging“. This involved customizing a Docker image, and it’s completely possible (probable?) I screwed it up. This is me when I hear the word “Docker”:

What I’m really hoping is that one of you log forensics gurus will make me feel dumb and tell me the very easy way to convert these into a readable format. Please leave a comment or reach out on LinkedIn if you want to get in on the fun and help me slay these logs.
As you can see there is MUCH we can learn about Google Drive data from a deadbox image when Google Drive for Desktop is installed. If you found this article useful or want me to dive into something more in depth, don’t hesitate to reach out.
Until next time. 👻
